









- Automotive
- Sanding - Polishing
- One sided adhesive tapes
- Packing tapes
- Coloured - marking tapes
- Electrical tapes
- Office tapes, adhesive tapes
- Slick surface tapes
- Metal adhesive tapes
- Masking crepe tape
- Masking special tapes
- Surface protection tapes
- Foam - sealing tapes
- Anti-slip tapes
- Self-adhesive rubber cut-outs
- Special tapes
- Textile tapes
- Warning and reflective tapes
- Double-sided adhesive tapes
- Electrical insulation material
- Glues
- Materiály pro výrobu technických štítků
- Flexible stoppers, bumpers
- Velcro straps
- Primers - activators - cleaners
- Accessories for adhesives, applicators
 Monitors
 Laptops
 Desktop computers
- Accessories
- Backpacks and laptop bags
- Electronic gadgets
- Ergonomic accessories
- External drives
- Gamepads
- Gaming tables
- Gaming chairs
- Microphones
- Internal drives
- Cables
- Office chairs
- Keyboards
- Mice
- Power supplies
- Memory cards
- Mouse pads
- Markers
- Projectors and accessories
- Mobile phone accessories
- Speakers
- Keyboard and mouse sets
- Headphones
- USB Flash discs
- Gaming steering wheels
- Scales
- Webcams
Canon PGI-570 and CLI-571 - how to easily replace the ink cartridge
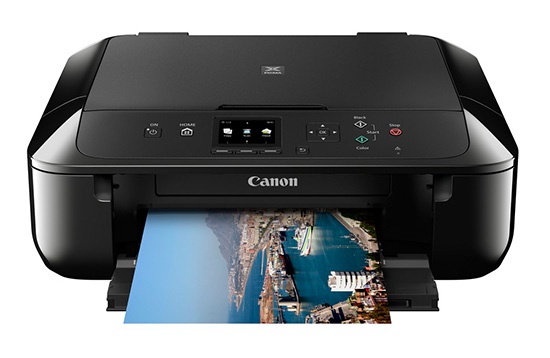
The Canon PGI-570 and CLI-571 cartridges are used in all of these printers. If you have one of them at home, this guide is just for you.
If a warning appears that ink is running low or an error occurs, the ink lamp and the Alarm lamp will flash to indicate the error. In such a case, it is not possible to print or scan on the printer. Count the number of flashes and, according to the printer manual, you can easily determine what the problem is.
If you find that your ink has run out, nothing could be easier than buying a new one from us and replacing it very easily according to this guide.
1) Make sure that the printer is turned on.
2) Open the front cover.
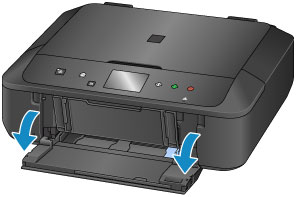
3) Lift the control panel and wait until the print head moves to the center of the printer. Do not stop the print head holder with your hand or move it.
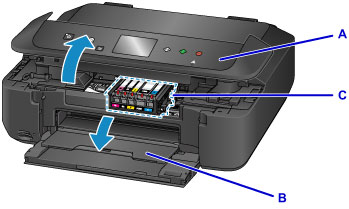
It is now possible to remove the Canon ink cartridges. Depending on which color is running low, replace that cartridge.
4) Press the latch on the cartridge and remove the cartridge upwards.
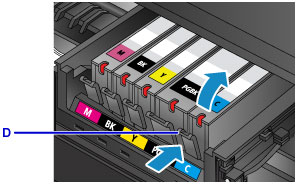
WARNING If you remove the cartridge, immediately insert a new cartridge. Do not leave the printer without the cartridge inserted.
5) Prepare a new Canon cartridge and remove its protective elements.
Tear off the strip at the top and remove the protective film.
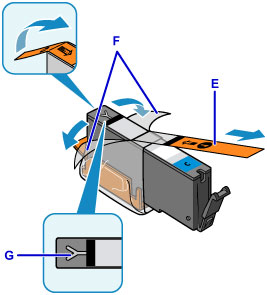
Hold the ink tank so that the protective cap (E) is facing upward. Be careful not to cover the Y-shaped vent hole. Then remove the protective cover.
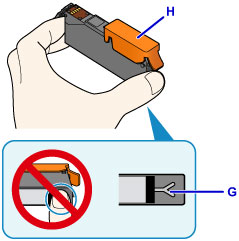
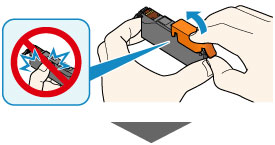
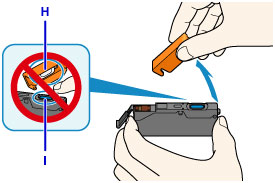
WARNING: Never touch the electronic contacts on the ink cartridge. Also, do not touch the part under the cover (you will get dirty).
6) You can now insert your new cartridge into the printer.
! IMPORTANT - Make sure to insert the correct color into the correct position !
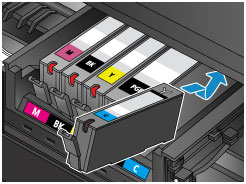
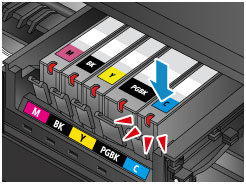
7) You can now close the cover with the control panel.
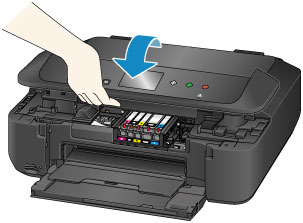
You are done. You managed everything and can happily print :-)
We wish you many beautifully printed photographs, texts, invoices, or anything else.
Denis from CDRmarket.cz